
Introducing the Castopod Installation Script
Install Castopod with a single command. The official installation script handles all dependencies, SSL certificates, database configuration, and security hardening automatically.
Introducing the Castopod Installation Script
curl -fsSL https://castopod.org/install | sudo bash
That's it. One command. The script will guide you through the rest. Go make coffee. Come back to a fully configured Castopod installation.
Tested Platforms
The installation script has been tested on:
- Ubuntu 24.04
- Debian 13
- Fedora 43
Recommended: Ubuntu LTS or Debian stable on a freshly installed server to avoid dependency conflicts.
Note: This is the very first public release of this installation script. It may contain bugs or unexpected behavior on certain configurations. If you encounter any issues, please report them. Contributions are welcome—feel free to submit a merge request to help improve the script.
Traditional Installation Process
Installing a self-hosted podcasting platform traditionally required multiple manual steps:
- SSH into your server
- Install and configure Nginx or Apache web server
- Install PHP with the correct version and required extensions
- Set up MariaDB database server
- Configure Redis cache server
- Configure PHP-FPM settings
- Write virtual host configuration
- Obtain SSL certificates with Certbot
- Set up certificate auto-renewal
- Create cron jobs for scheduled tasks
- Set proper file permissions and ownership
- Troubleshoot configuration issues
For multiple podcast instances on one server, each step needed to be repeated with careful attention to avoid conflicts between installations.
The New Way: One Command
We got tired of this. So we built a script that does it all. SSL certificates, database configuration, cron jobs, security hardening—all automated. You can be podcasting in minutes instead of hours.
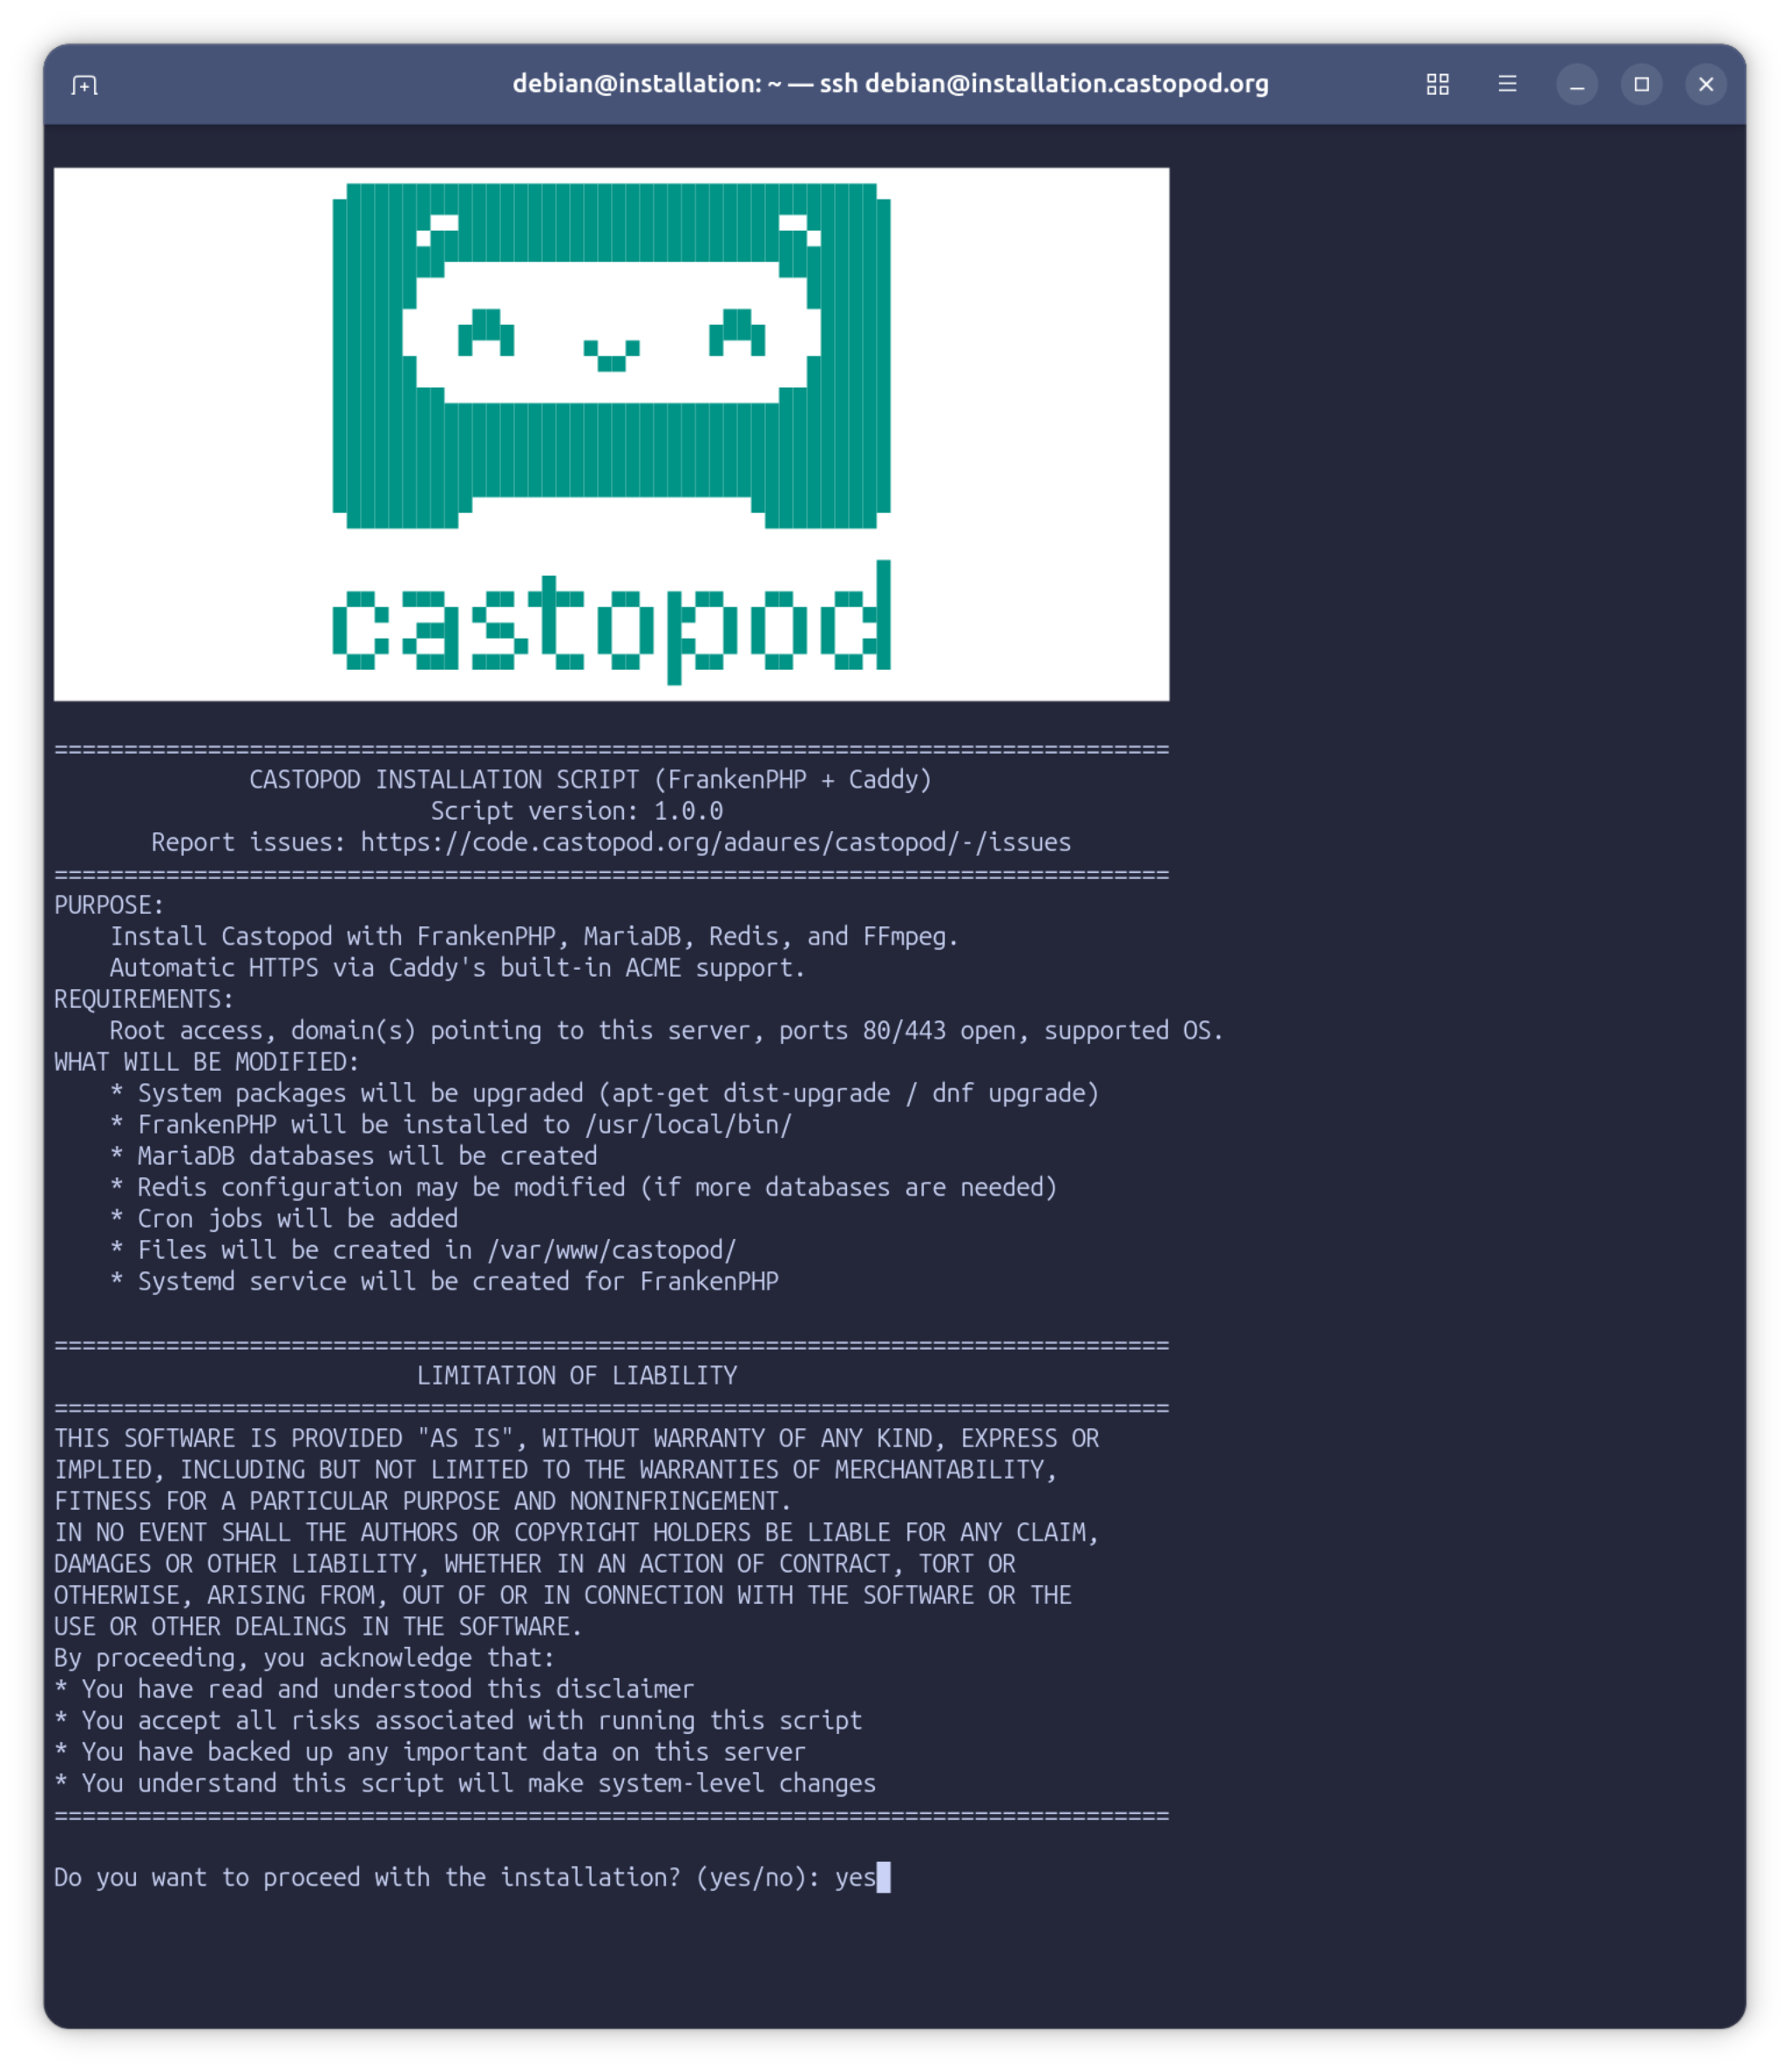
⚠️ Security Disclaimer
Never blindly run scripts from the internet with sudo. That command above downloads and executes code with root privileges on your server. Only run it if:
- You trust the source - This script is maintained by the Castopod team and open source
- You've reviewed the code - Download it first and read what it does:
wget https://castopod.org/install-castopod.sh - You understand the scope of the modifications - The script upgrades system packages, installs software (FrankenPHP, MariaDB, Redis/Valkey, FFmpeg), modifies system configurations, and creates databases
We strongly recommend downloading the script first, reviewing it, and then running it:
# Download and review the script
wget https://castopod.org/install-castopod.sh
less install-castopod.sh  # Read through it

# Make it executable
chmod +x install-castopod.sh

# Run it after you're comfortable with what it does
sudo ./install-castopod.sh
The script is extensively commented (almost every line has an explanation) to make auditing easier.
What Makes This Special?
🏎️ Powered by FrankenPHP and Caddy
This installation script uses a modern, streamlined stack: FrankenPHP with Caddy.
What is FrankenPHP?
FrankenPHP is a modern PHP application server built on top of Caddy. It's a single binary that includes:
- PHP runtime - No separate PHP-FPM installation needed
- Caddy web server - Production-ready, high-performance web server
- Worker mode - Keeps your PHP application in memory for blazing-fast responses
Why it's cool: Traditional setups require Nginx + PHP-FPM + careful socket configuration. FrankenPHP is just one binary. Download it, point it at your PHP app, done. No more debugging "502 Bad Gateway" errors because PHP-FPM crashed.
Performance: FrankenPHP can run in worker mode, keeping your application in memory between requests. This eliminates the PHP bootstrap overhead on every request—no more loading frameworks, parsing configs, and establishing database connections for each visitor. The result? Significantly faster response times and lower server load.

What is Caddy?
Caddy is a modern web server that handles HTTPS automatically. Its killer feature: automatic SSL certificates.
Why it's cool: With Nginx, you need to install Certbot, run it manually, set up cron jobs for renewal, and debug certificate issues. With Caddy, you just specify your domain name. Caddy automatically:
- Obtains certificates from Let's Encrypt
- Renews them before they expire
- Handles HTTPS redirects
- Manages certificate storage
No Certbot. No cron jobs. No manual renewal. It just works.
🚀 Truly Automated
The script doesn't just install packages. It:
- Upgrades your entire system first (security matters!)
- Installs ALL dependencies with the correct versions (FrankenPHP with embedded PHP, MariaDB, Redis/Valkey, FFmpeg)
- Creates unique databases for each instance with randomly generated 32-character passwords
- Manages Redis database numbers automatically (even expands the database pool when needed!)
- Generates Caddy configurations optimized for Castopod
- Obtains SSL certificates automatically via Caddy's built-in ACME support (no Certbot needed!)
- Sets up cron jobs for scheduled tasks and session cleanup
- Configures file permissions correctly (because 777 is not the answer)
- Locks down databases to localhost only (security by default)
- Generates a detailed installation log with every password, URL, and config path you'll need
🎯 Interactive by Default, Silent When You Need It
Run it without arguments and you get a friendly guided experience:
sudo ./install-castopod.sh
For automation, CI/CD, or when you just want to get things done:
sudo ./install-castopod.sh -y podcast1.com podcast2.com podcast3.com
Zero prompts. Pure automation.
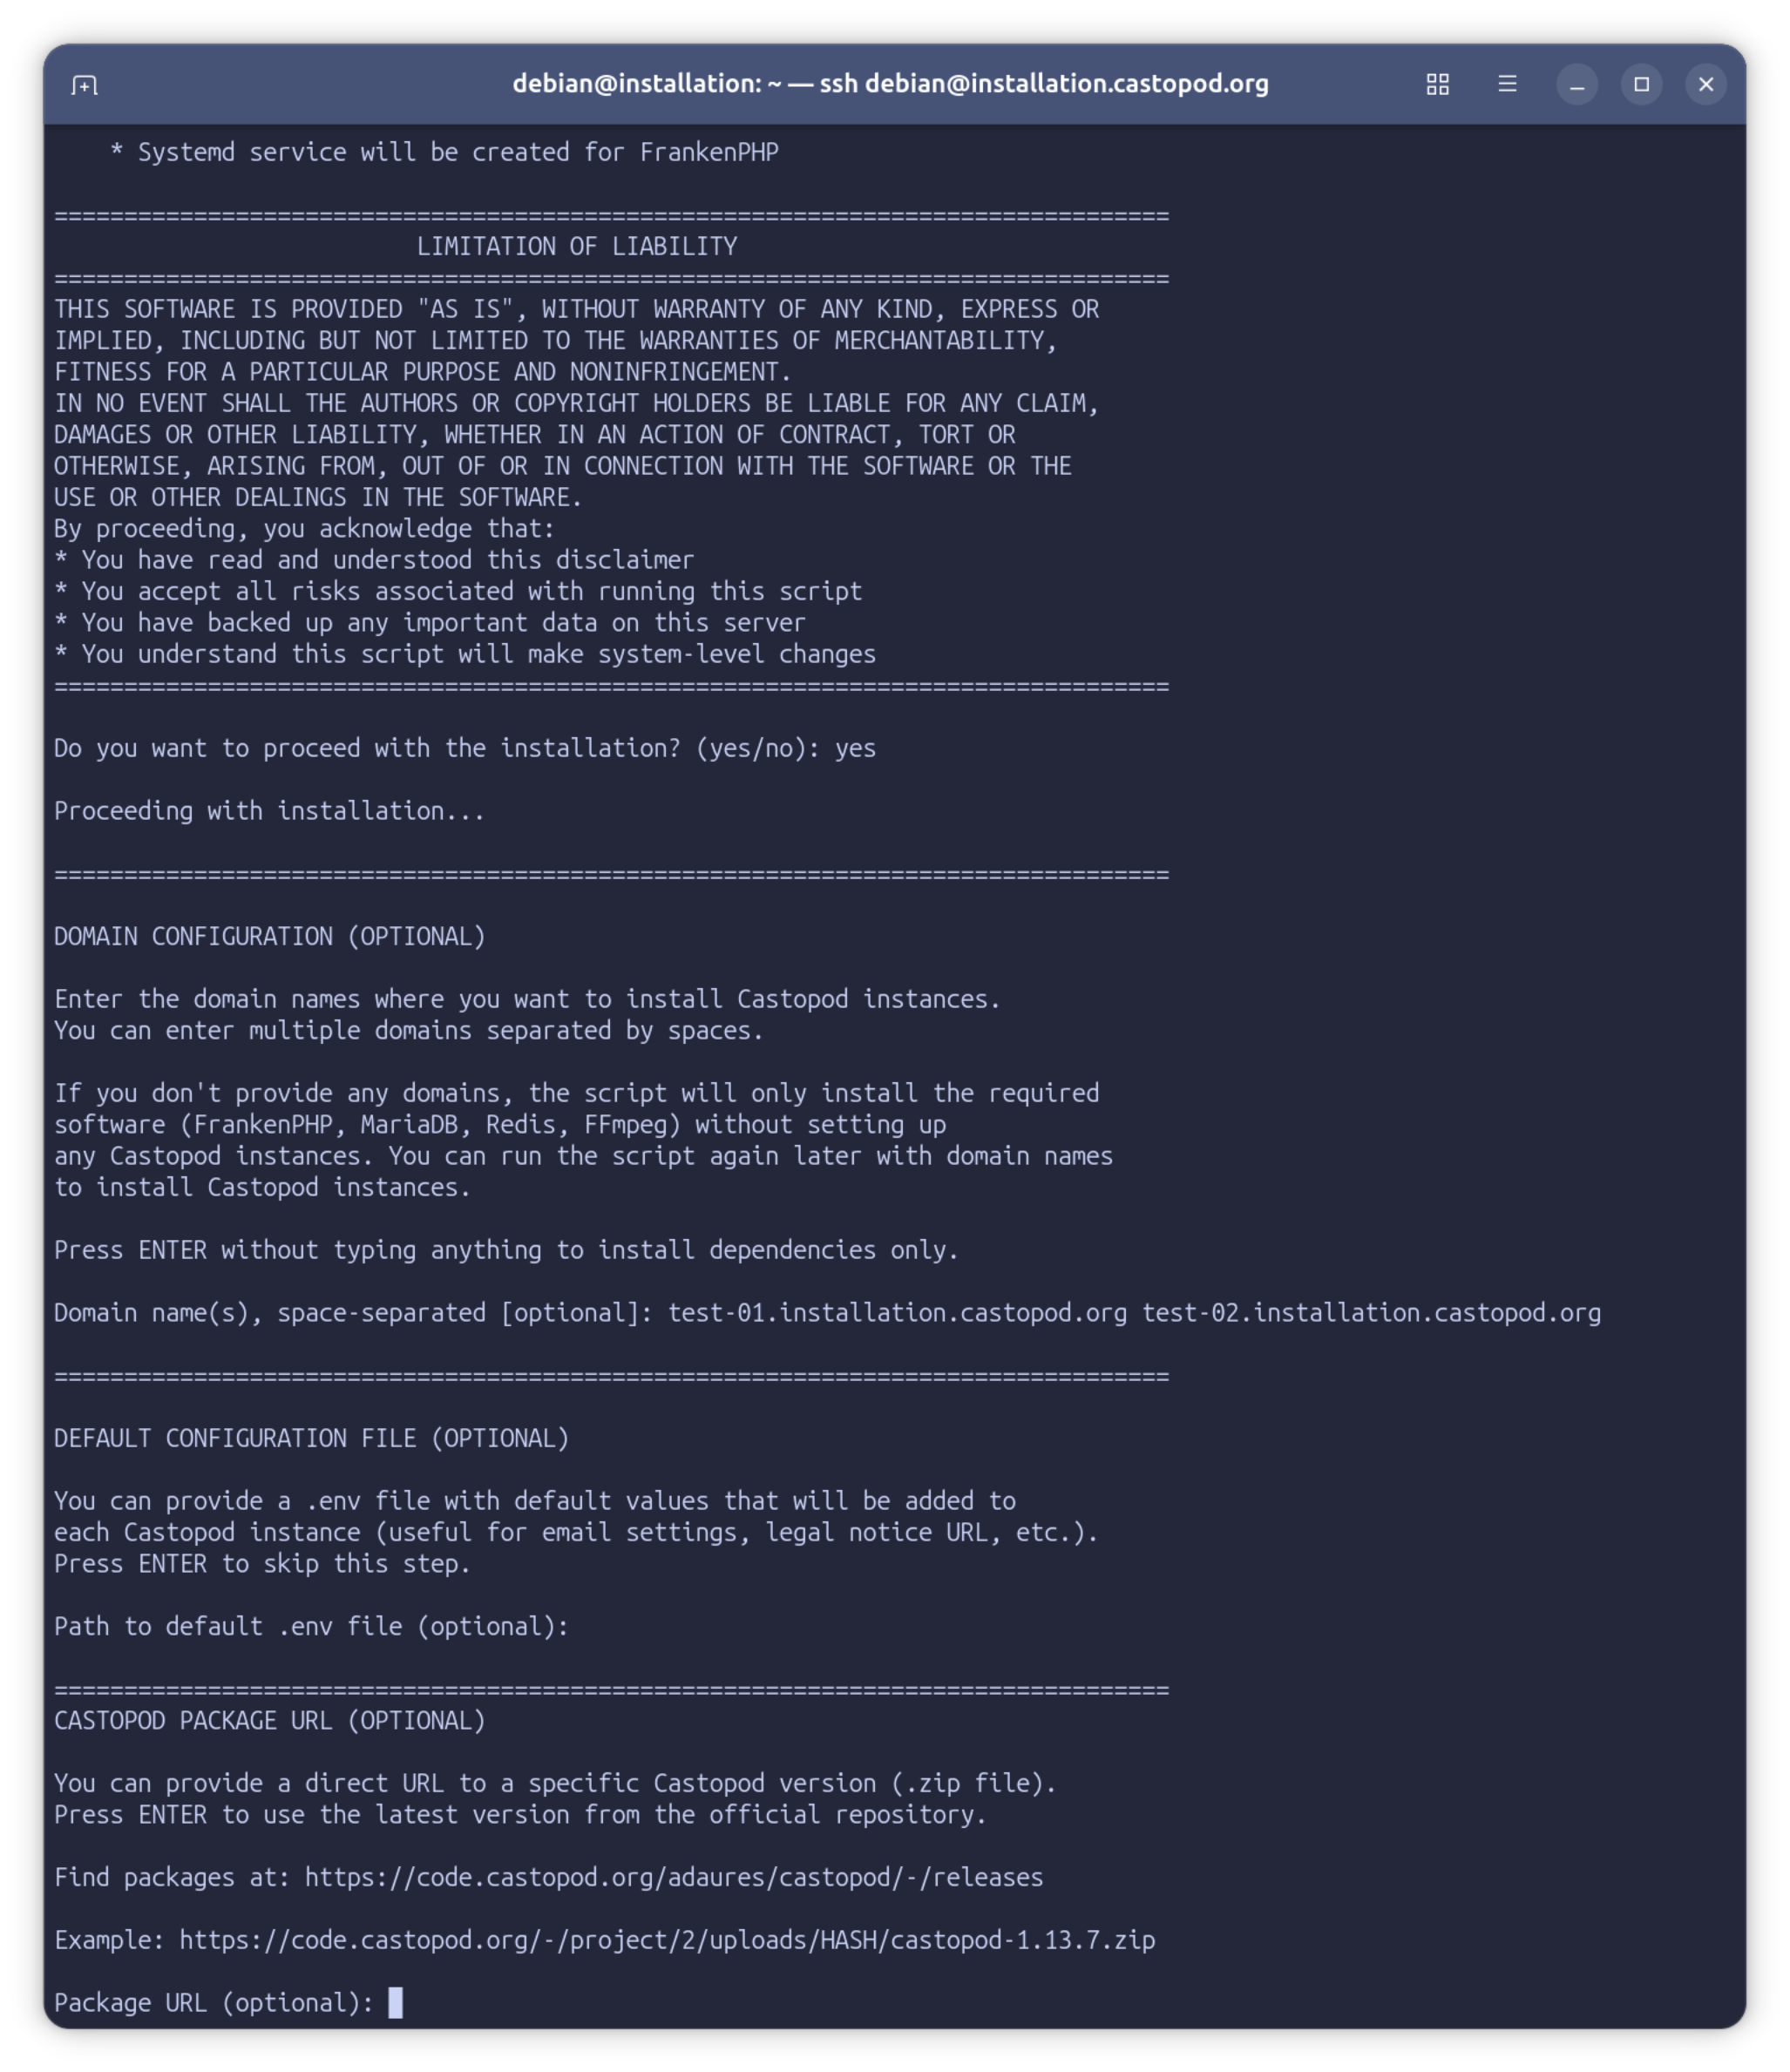
🏢 Multiple Instances? No Problem.
Want to host multiple podcasts on one server? Just list the domains:
sudo ./install-castopod.sh -y \
  comedy-show.com \
  tech-talk.fm \
  cooking-podcast.org
Each gets:
- Its own directory (
/var/www/castopod/DOMAIN/) - Its own MariaDB database and user
- Its own Redis database number
- Its own Caddy configuration block
- Its own SSL certificate (automatically managed)
- Its own cron jobs
- Its own access and error logs
No conflicts. No shared credentials. Clean separation.
🔒 Secure by Default
We didn't just automate the installation—we hardened it:
Database Isolation
# MariaDB: Locked to localhost
bind-address = 127.0.0.1

# Redis: Locked to localhost
bind 127.0.0.1
protected-mode yes
What this means: Your databases aren't exposed to the internet. Attackers can't even reach them, let alone brute-force them.
Random Credentials Everywhere
- Database passwords: 32 random characters
- Installation keys: 6 random characters
- Analytics salts: 64 random characters
No more "password123" or "castopod" defaults.
Principle of Least Privilege
FrankenPHP runs as a dedicated castopod user—not root. If the web server is ever compromised, the attacker doesn't get root access to your system.
File ownership follows the same principle:
/var/www/castopod/domain.com/
├── app/                 # owned by root (read-only)
├── public/
│   ├── index.php        # owned by root (read-only)
│   └── media/           # owned by castopod (uploads go here)
├── writable/            # owned by castopod (logs, sessions)
└── .env                 # owned by root (read-only config)
What this means: The web application can only write where it absolutely needs to. An attacker can't modify your application code, even if they find an exploit.
SSL Certificates: Zero Configuration
With Caddy, SSL certificates are truly automatic:
- Caddy detects your domain from the configuration
- Obtains certificates from Let's Encrypt on first request
- Stores them securely in
/var/lib/castopod/caddy/ - Renews them automatically before expiry
No Certbot. No cron jobs. No manual commands. Just add a domain and Caddy handles everything.
Your certificates renew themselves. You'll never think about SSL again.
📦 Install Specific Versions
Need to install a specific Castopod version? Easy:
# Find available versions at:
# https://code.castopod.org/adaures/castopod/-/releases

sudo ./install-castopod.sh -y podcast.com \
  --package-url https://code.castopod.org/-/project/2/uploads/.../castopod-1.13.7.zip
In interactive mode, the script even shows you the URL to the releases page.
📝 Logging Done Right
Every installation creates two types of logs:
1. Main Installation Log
/var/log/castopod-install-20260119_143022.log
Contains:
- Every command executed
- All generated passwords
- System configuration changes
- Error messages (if any)
2. Per-Instance Logs
/var/www/castopod/podcast.example.com/installation.log
Contains:
- Installation URL:
https://podcast.example.com/ABC123-install - Database credentials
- Redis configuration
- FrankenPHP/Caddy paths
- Cron job details
- Debugging commands
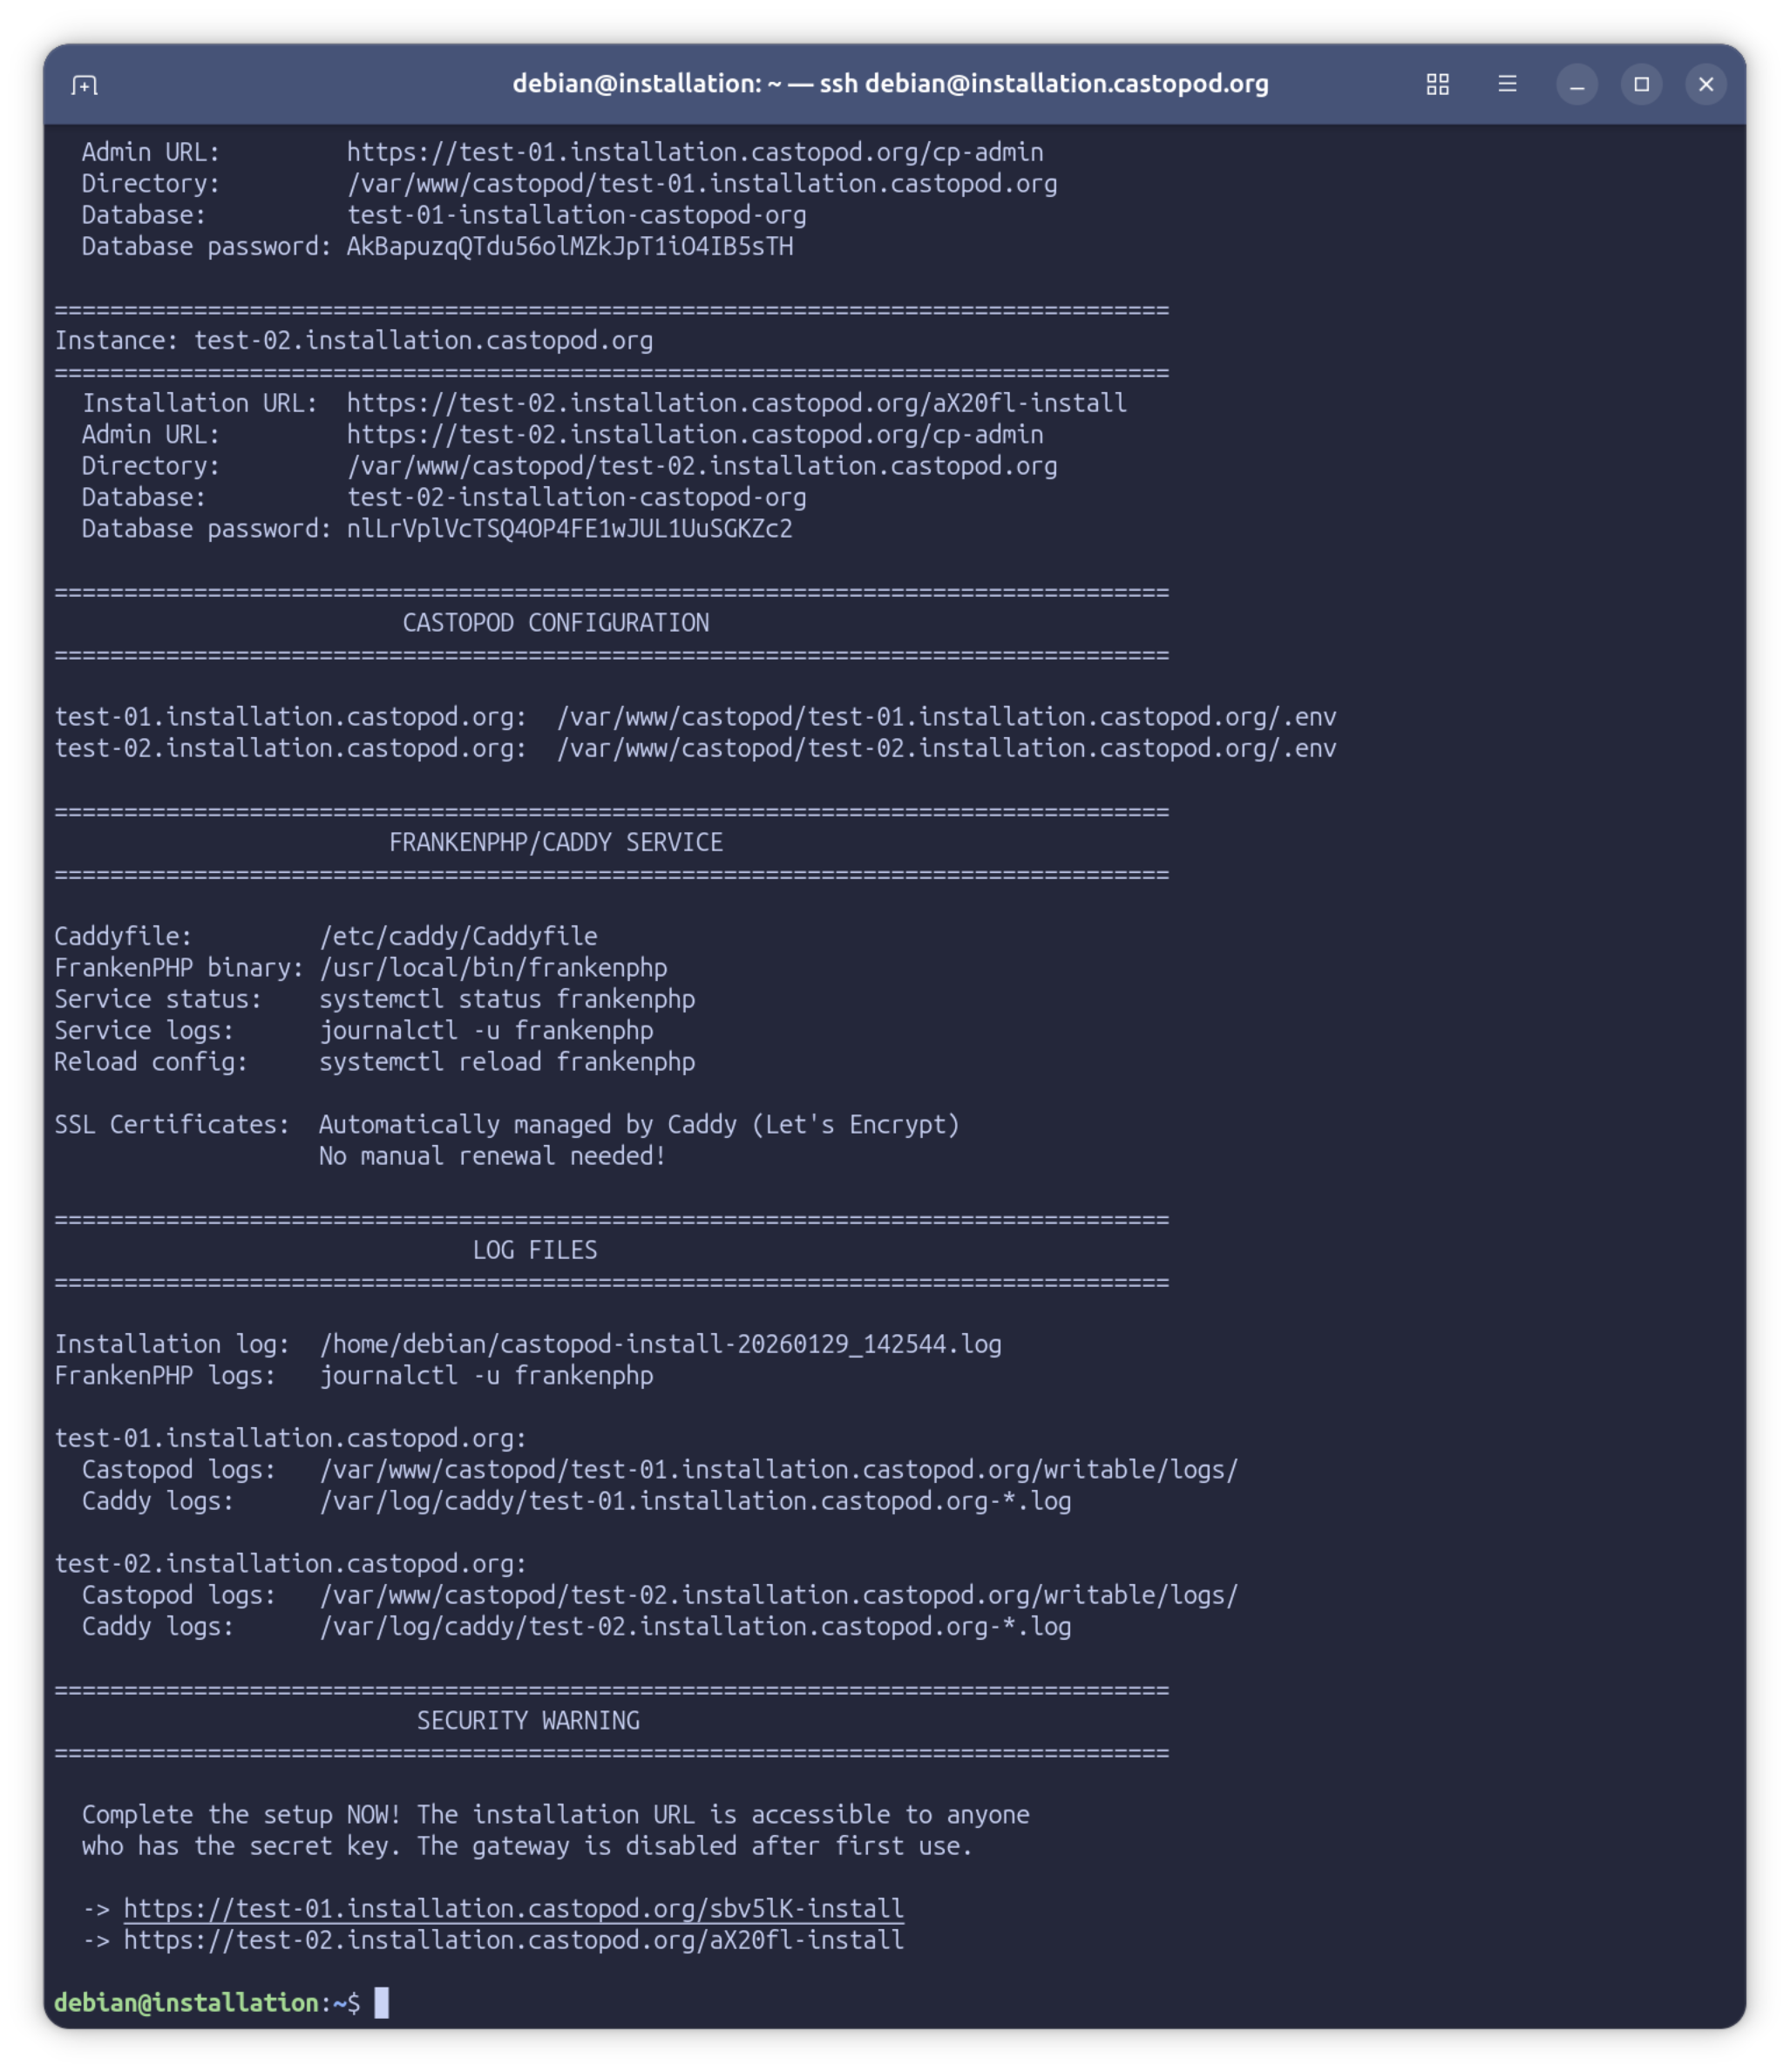
Need to know your database password in 6 months? It's in the log. Need to find your Nginx config? It's in the log. Everything is documented.
🔧 Troubleshooting Built In
Each instance log includes a complete debugging section:
# Check application errors
sudo tail -f /var/www/castopod/podcast.com/writable/logs/*.log

# Check web server / FrankenPHP logs
journalctl -u frankenphp -f

# Check Caddy access logs
sudo tail -f /var/log/caddy/podcast.com-access.log

# Check Redis
redis-cli -h 127.0.0.1 ping

# Test scheduled tasks
sudo -u castopod /usr/local/bin/frankenphp php-cli /var/www/castopod/podcast.com/spark tasks:run

# Reload FrankenPHP configuration
sudo systemctl reload frankenphp
Copy-paste ready. No guessing about file paths.
How It Works
Step 1: System Preparation
The script detects your Linux distribution (Debian, Ubuntu, CentOS, RHEL, or Fedora) and upgrades all packages:
# Debian/Ubuntu
apt-get dist-upgrade -y

# CentOS/RHEL/Fedora
yum upgrade -y
Why? Security. You want the latest patches before installing a public-facing web application.
Step 2: Dependency Installation
Installs everything Castopod needs:
- FrankenPHP - Modern PHP application server with built-in Caddy web server
- MariaDB - Database server
- Redis/Valkey - Cache server (Valkey on Fedora 41+, Redis elsewhere)
- FFmpeg - Media processing
That's it. No separate PHP installation, no Certbot, no complex configurations. FrankenPHP bundles PHP with all required extensions and handles HTTPS automatically.
Step 3: Per-Instance Setup
For each domain you specified:
- Downloads Castopod (latest version or your specified URL)
- Extracts to
/var/www/castopod/DOMAIN/ - Creates database with random credentials
- Allocates Redis database number (auto-expands pool if needed)
- Generates .env file with all configuration
- Adds domain to Caddyfile with optimized settings
- Sets up cron jobs in
/etc/cron.d/ - Configures permissions (root owns files, castopod owns only writable/ and public/media/)
SSL certificates? Caddy handles that automatically when the first request comes in. No extra steps needed.
Step 4: You're Done!
The script shows you the installation URLs:
🌐 podcast.example.com
   https://podcast.example.com/ABC123-install
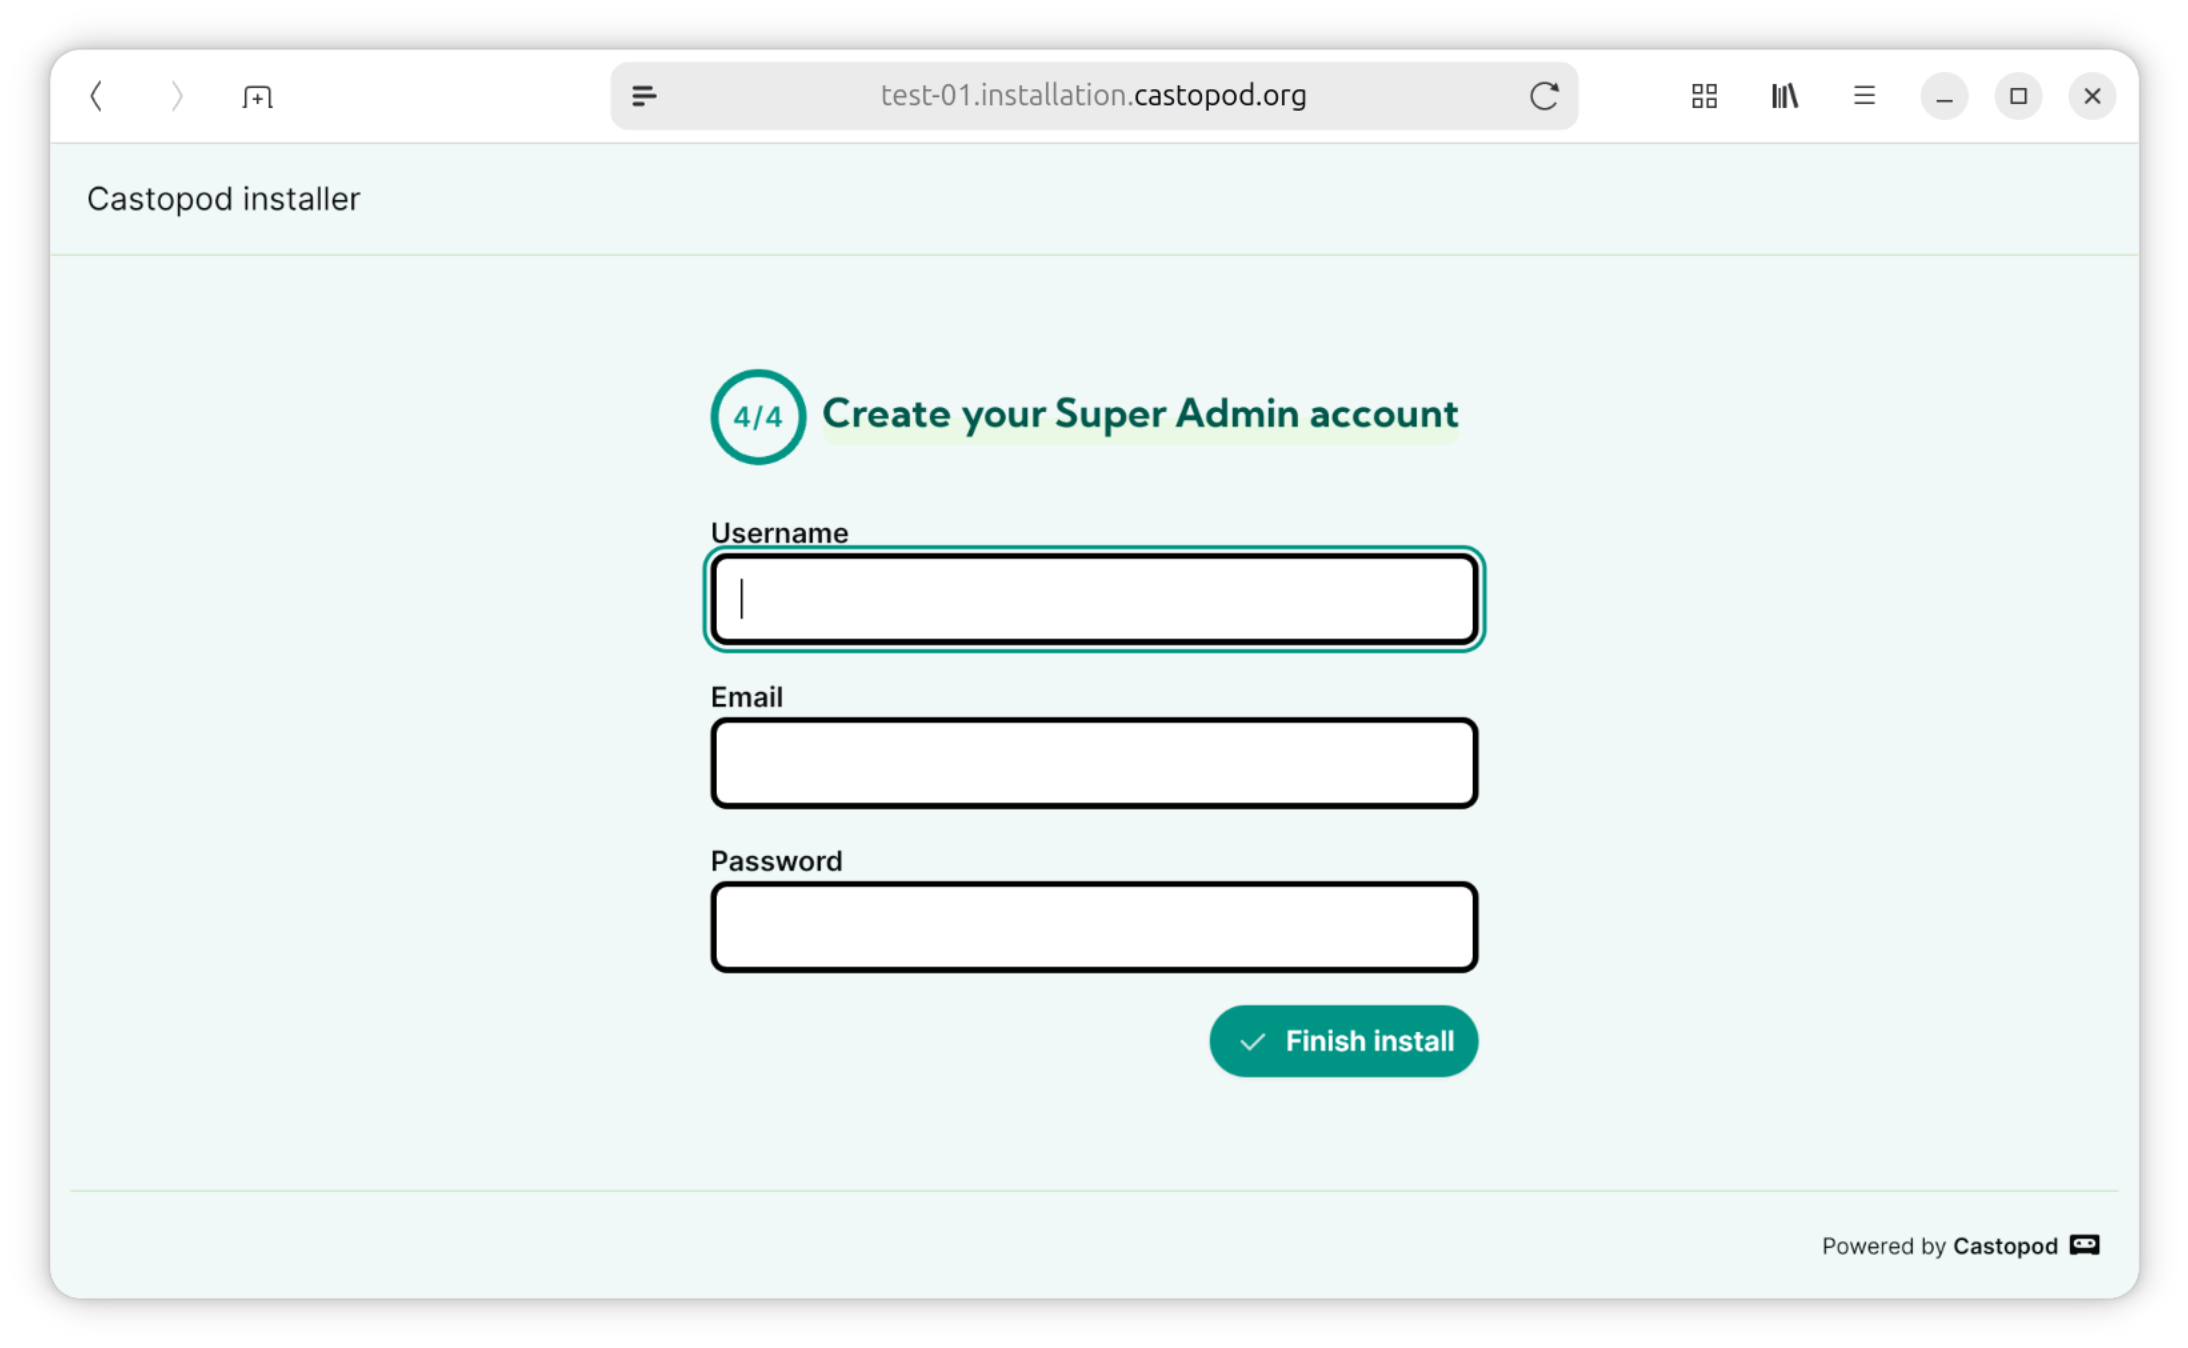
Open that URL, create your admin account, and start podcasting.
Real-World Examples
Example 1: Single Podcast for Personal Use
# Download the script
wget https://castopod.org/install-castopod.sh
chmod +x install-castopod.sh

# Run it (interactive mode)
sudo ./install-castopod.sh

# Follow the prompts:
# - Confirm you want to proceed
# - Enter your domain: mypodcast.com
# - Press ENTER to skip the .env file option

# Done! Open the installation URL and set up your podcast
Example 2: Podcast Network with 10 Shows
# Create a list of domains
DOMAINS="
  show1.podcast-network.com
  show2.podcast-network.com
  show3.podcast-network.com
  tech-show.podcast-network.com
  comedy-show.podcast-network.com
  interview-show.podcast-network.com
  news-show.podcast-network.com
  sports-show.podcast-network.com
  music-show.podcast-network.com
  culture-show.podcast-network.com
"

# Install all at once (non-interactive)
sudo ./install-castopod.sh -y $DOMAINS
Each show gets complete isolation. Each has its own admin panel, database, and configuration.
[SCREENSHOT: Terminal showing multiple successful installations]
Example 3: Automated Deployment with Default Settings
# Create default.env with network-wide settings
cat > default.env <<'EOF'
app.storageLimit=100
app.legalNoticeURL="https://YOUR_WEBSITE/LEGAL_PAGE"
email.protocol="smtp"
email.SMTPHost="YOUR_SMTP_GATEWAY"
email.SMTPPort=587
email.SMTPUser="SMTP_USER_NAME"
email.fromEmail="SMTP_USER_ADDRESS"
email.SMTPPass="SMTP_USER_PASSWORD"
EOF

# Deploy with defaults
sudo ./install-castopod.sh -y \
  new-show.podcast-network.com \
  --env-file default.env
The script appends default.env to each instance's .env file. Consistent configuration across all shows.
The Details That Matter
Videoclips Ready Out of the Box
Castopod lets you generate shareable videoclips from your podcast episodes—perfect for promoting your content on social media. This feature requires FFmpeg, which the script installs automatically. No extra configuration needed. Just upload your episode, select a clip, and Castopod handles the rest.
Large File Uploads: Handled
The script configures both Caddy and PHP for 512MB uploads:
# Caddyfile
request_body {
    max_size 512MB
}
# PHP (via /etc/frankenphp/conf.d/99-castopod.ini)
upload_max_filesize = 512M
post_max_size = 512M
memory_limit = 512M
max_execution_time = 300
Upload your 3-hour podcast episodes without worrying about file size limits.
Redis Database Auto-Expansion
Redis defaults to 16 databases (0-15). Installing your 17th podcast?
Traditional approach: Manually edit /etc/redis/redis.conf, increase databases, restart Redis, hope nothing breaks.
Our script: Detects you're out of databases, backs up the config, increases by 16, restarts Redis, continues installation.
You: Don't even notice.
[ILLUSTRATION: Visual showing Redis database pool automatically expanding from 16 to 32 databases]
Cron Jobs That Actually Work
We learned this the hard way: user crontabs and system cron have different formats.
The script creates cron files in /etc/cron.d/ with the correct format:
# /etc/cron.d/castopod-podcast-example-com

# Run scheduled tasks every minute (only errors are logged)
* * * * * castopod /usr/local/bin/frankenphp php-cli /var/www/castopod/podcast.example.com/spark tasks:run 2>> /var/www/castopod/podcast.example.com/writable/logs/cron-errors.log

# Clean up old sessions daily at 3 AM (only errors are logged)
0 3 * * * castopod find /var/www/castopod/podcast.example.com/writable/session/ -type f -mtime +7 -delete 2>> /var/www/castopod/podcast.example.com/writable/logs/cron-errors.log
Each instance gets its own cron file. Errors are logged to cron-errors.log for easy debugging without filling up disk space.
Separate Caddy Logs Per Domain
Ever tried to debug one site when logs from 10 sites are mixed together? It's painful.
Each instance gets separate logs:
/var/log/caddy/podcast.example.com-access.log
/var/log/caddy/podcast.example.com-error.log
Plus, you can check the FrankenPHP service logs anytime:
journalctl -u frankenphp
Debug one site without sifting through traffic from all the others.
System Requirements
- Operating System: Ubuntu LTS or Debian stable (recommended), or Fedora (latest)
- Root access: You'll need
sudo - DNS configured: Your domain must point to your server's IP
- Ports open: 80 and 443 for SSL certificate generation
- Stable internet: The script upgrades system packages (may take a few minutes)
That's it. No special hardware. No complicated prerequisites.
FAQ
Can I install just the dependencies without any instances?
Yes! Run the script without domain names:
sudo ./install-castopod.sh -y
This installs Nginx, PHP, MariaDB, Redis, FFmpeg, and Certbot—but doesn't create any Castopod instances. Add instances later by running the script again with domain names.
Does this work on existing servers?
Yes. The script is idempotent—it won't reinstall packages that already exist. It's safe to run on servers with other websites.
What if I already have a web server installed?
FrankenPHP runs as its own service on ports 80 and 443. If you have Nginx or Apache already running on those ports, you'll need to either:
- Stop the existing web server:
sudo systemctl stop nginx - Or configure FrankenPHP to use different ports and set up a reverse proxy
For fresh servers, FrankenPHP handles everything. Your existing MariaDB databases won't be affected.
Can I customize the installation?
Yes. The script is thoroughly commented—almost every line has an explanation. You can modify it to fit your needs, or use the --env-file option to provide custom configuration values.
What if something goes wrong?
Check the installation log (path shown at the end of the script). It contains every command executed and all error messages. The per-instance logs also include debugging commands for common issues.
If you're stuck, the logs are extremely helpful for getting support.
How do I uninstall an instance?
The script doesn't include an uninstaller (yet), but each instance log documents what was created:
# Example cleanup for podcast.example.com

# Remove domain from Caddyfile
sudo nano /etc/caddy/Caddyfile  # Remove the podcast.example.com { ... } block
sudo systemctl reload frankenphp

# Remove installation directory
sudo rm -rf /var/www/castopod/podcast.example.com

# Remove database
sudo mysql -e "DROP DATABASE IF EXISTS \`podcast-example-com\`;"
sudo mysql -e "DROP USER IF EXISTS 'podcast-example-com'@'localhost';"

# Remove cron jobs
sudo rm /etc/cron.d/castopod-podcast-example-com

# SSL certificates are managed automatically by Caddy - no manual cleanup needed
Is this production-ready?
Yes. The script:
- Uses stable package versions
- Implements security best practices
- Generates detailed logs for auditing
- Has been tested on multiple distributions
- Handles errors gracefully
Get Started
Download and Run
# Method 1: Direct from the web (easiest)
curl -fsSL https://castopod.org/install | sudo bash

# Method 2: Download first, review, then run (recommended for security)
wget https://castopod.org/install-castopod.sh
less install-castopod.sh  # Review the script first!
chmod +x install-castopod.sh
sudo ./install-castopod.sh
Security reminder: Method 2 is recommended. Always review scripts before running them with sudo.
What to Expect
Time: 5-15 minutes depending on your server's internet speed and whether it needs to upgrade packages.
User interaction (interactive mode):
- Confirm you want to proceed
- Enter domain names
- Optionally provide a default .env file path
User interaction (non-interactive mode): Zero. Perfect for automation.
Result: A fully configured Castopod installation ready for your content.
Why We Built This
Self-hosting shouldn't be hard. Podcasters should spend time creating content, not wrestling with server configurations.
We wanted anyone with a domain name and a server to be able to install Castopod in minutes—not hours or days. We wanted the installation to be secure by default, not after you read 17 blog posts about hardening PHP applications.
This script is our answer: One command. Five minutes. Done.
Resources
- Installation Script: https://castopod.org/install-castopod.sh
- Castopod Releases: https://code.castopod.org/adaures/castopod/-/releases
- Documentation: https://docs.castopod.org
- Source Code: https://code.castopod.org/adaures/castopod
- Report Issues: https://code.castopod.org/adaures/castopod/-/issues
- Community: https://podlibre.social/@castopod
- FrankenPHP: https://frankenphp.dev
- Caddy: https://caddyserver.com
Try It Today
Got a server and a domain? You're 5 minutes away from running Castopod:
curl -fsSL https://castopod.org/install | sudo bash
That's all it takes. (But remember to review the script first if you're security-conscious!)